Agentic Coding 101
By Andrew Kurin
Posted July 20, 2025
Reading time: 12 minutes.
So, you keep hearing about how AI is going to write all the code soon, and that programming is going to be obsolete. And you would like to see for yourself what the fuss is all about.
Maybe you tried GitHub copilot before. Or regularly working with AI chat (Claude/Gemini/ChatGPT) to write you bits and pieces of code. Sometimes it knocks things out of the park, and sometimes it completely hallucinates some APIs or misinterprets your intent.
Or maybe you never wrote a line of code before, but you have a great idea which you’d want to prototype with AI. You might have heard about Agentic Coding, but how can you make these agents do your bidding and build a functional application?
Let’s start with the some basic definitions.
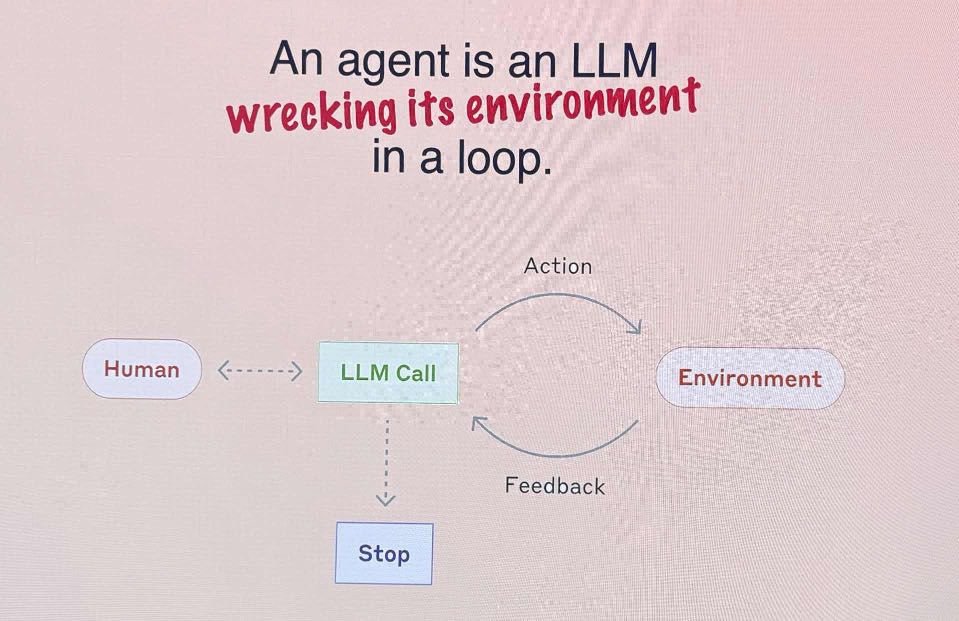
Agent is an LLM model using its tools in a loop.
Agentic coding is a process of writing code by prompting an agent, and giving it enough context to achieve your goals.
LLMs are notorius for their unreliability and hallucinations. Turns out, giving them a proper context and allowing them to check their results (compile the code, run tests, linting, etc) works pretty well to address those issues. That’s why agentic coding could be so powerful. But not all of the agents are created equal. Specific choice of LLM model, and tools that operate the model, matter.
The tool
Claude Code
AI field is rapidly evolving, new coding agents emerge every day. But at this point, the most advanced agentic coding tool is Claude Code. It is a command-line tool that allows you to interact with Claude AI, create and edit files, run your code and debug it.
There are several reasons for Claude Code being so much ahead of the competition:
- Anthropic has been laser-focused on tuning their models for development purposes.
- Claude models are exceptionally good at tool calling, which is crucial for agentic coding.
- Anthropic has been using Claude Code internally for months before releasing it to the public, which gave them a substantial head-start.
- The fact that Claude Code is terminal-based makes it easy to integrate with any IDE or use it as a standalone tool.
- At the time of writing, pricing is competitive. You can start using it with the $20-per-month Pro plan, then upgrade to $100-per-month Pro Max, or $200-per-month Pro Max if you keep hitting the limits. For comparison, using API prices, it is not uncommon to pay $100 per day during intensive coding sessions.
Honorable mentions
There are other CLI-based tools that are not quite there yet, but worth watching:
- OpenAI’s Codex CLI - OpenSource and supports multiple models, not as mature as Claude Code.
- Gemini CLI - OpenSource, supports only Gemini models, has a large context window, not very good at tool calling and fairly new.
- Sourcegraph’s Amp - commercial, could be quite expensive as it is based on the LLM tokens.
My advice is to start with Claude Code with the $20-per-month Pro plan, stick to Claude Sonnet 4 model, then upgrade if you keep hitting the limits.
The workflow
Once you install Claude Code, you can start using it right away.
Exploration
The easiest way to start, if you have an existing code base, is to run claude in the project’s folder and start asking questions:
- what does this code do?
- what is the purpose of this function?
- how do I build/run this code?
Refactoring
That would give you a feel to what Claude Code can do.
After some exploration, you can ask Claude to make some small changes to your code base:
- write a unit test for this function
- refactor this big function into smaller ones
- extract this logic into a separate function
It is always better to use plan mode first (shift-tab to switch) and ask Claude to create a plan for the changes you want to make. That will make sure that you and Claude are on the same page on what needs to be done. If you like the plan you can accept it, otherwise you can reject it and tell Claude what to change.
Greenfield development
The prompts in this section are taken from Harper Reed’s blog posts: Basic Claude Code and My LLM codegen workflow atm. I highly recommend reading both of them.
To start a new project, first you need to come up with the plan of what you want to build. You can either do it directly in Claude Code or use your favorite AI model in chat.
You can start by asking:
Ask me one question at a time so we can develop a thorough, step-by-step spec for this idea. Each question should build on my previous answers, and our end goal is to have a detailed specification I can hand off to a developer. Let’s do this iteratively and dig into every relevant detail. Remember, only one question at a time.
Here’s the idea:
<IDEA>
Once you feel like the plan is complete, you can ask:
Now that we’ve wrapped up the brainstorming process, can you compile our findings into a comprehensive, developer-ready specification? Include all relevant requirements, architecture choices, data handling details, error handling strategies, and a testing plan, so a developer can immediately begin implementation.
For Claude Code you can also ask it to create a spec.md and place it in the project’s folder.
For very small projects, like single-page website, or small CLI tool, this spec could be used as the prompt itself. You can just paste it into Claude Code and ask it to build the project.
But most of the time, it will be too ambitious to ask Claude to build everything in one shot. So you would need to break it down into smaller prompts first. At this point, you will probably need to use a different model.
The issue with Claude Code is that it is a great worker, but its context window is limited. Several times when I’ve asked Claude to generate a comprehensive plan, it would just run out of context window. I usually use Gemini 2.5 Pro via AI Studio.
AI Studio allows you to pick thinking budget for your model, and also formatting of the output is superior to regular Gemini app. Gemini’s context window is huge, so you can generate pretty comprehensive plans with it. But you can also use other thinking models, like OpenAI o3.
With Gemini, just crank your thinking budget to the max, paste or attach your spec.md file, and ask:
Draft a detailed, step-by-step blueprint for this project. Then, once you have a solid plan, break it down into small, iterative chunks that build on each other. Look at these chunks and then go another round to break it into small steps. Review the results and make sure that the steps are small enough to be implemented safely with strong testing, but big enough to move the project forward. Iterate until you feel that the steps are right sized for this project. From here you should have the foundation to provide a series of prompts for a code-generation LLM that will implement each step in a test-driven manner. Prioritize best practices, incremental progress, and early testing, ensuring no big jumps in complexity at any stage. Make sure that each prompt builds on the previous prompts, and ends with wiring things together. There should be no hanging or orphaned code that isn’t integrated into a previous step. Make sure and separate each prompt section. Use markdown. Each prompt should be tagged as text using code tags. The goal is to output prompts, but context, etc is important as well. Create a single markdown file
prompt_plan.md
Then you can copy the resulting markdown and save it as prompt_plan.md in your project’s folder. The prompt_plan.md acts as your executable roadmap, turning the high-level spec.md into a series of concrete prompts for coding agent to implement.
Ask Claude to execute the prompts:
- Open @prompt_plan.md and identify any prompts not marked as completed.
- For each incomplete prompt: - Double-check if it’s truly unfinished (if uncertain, ask for clarification). - If you confirm it’s already done, skip it. - Otherwise, implement it as described. - Make sure the tests pass, and the program builds/runs - Commit the changes to your repository with a clear commit message. - Update @prompt_plan.md to mark this prompt as completed.
- After you finish each prompt, pause and wait for user review or feedback.
- Repeat with the next unfinished prompt as directed by the user.
Claude is very capable, but it’s far from perfect. Sometimes it would claim that the prompt is finished, but in fact it won’t. Typically you would need to do some QA after each prompt.
You can tell it to run tests/linter/typecheck after each prompt, but sometimes it would forget, and you would need to run it manually.
You also want to commit the changes frequently, especially after you reach a good state, i.e. clean test run, linter, typechecks, working UI. This way if it messes up on the next prompt you can just reset and start again.
Advanced Strategies: Managing Context and Overcoming Blocks
Context Management
Important aspect of working with Claude is context management. The closer the context is to being 100% full, the more likely for the model to go off the rails. So a lot of times you would want to run /compact (summarizes existing context) or even /clear to free the context and start fresh.
That’s why keeping prompt plan in the file is important, as it acts as an external memory.
Over time you will develop an intuition about when the LLM is on a successful trajectory, or when it is making a mess, and it is time to abort and reset. Long fruitless loops and Claude undoing its previous changes are good indicators that it is time to start fresh.
Overcoming Blocks
Sometimes, Claude gets stuck on implementing some challenging functionality, or fixing some difficult bug, and even resetting context and starting fresh doesn’t help. Typically it happens because it lacks necessary context to fully “understand” the problem. There are various strategies to solving those issues.
1. Using a Gemini CLI for Gemini’s 2.5 Pro larger model.
You can run Gemini CLI and point it to the same code, and ask it to understand the problem, and develop a plan to fix it. This is particularly useful when your project has large files, and Claude is unable to read them entirely.
2. Semi-manual focused approach using different model.
I like using Simon Willison’s excellent LLM tool with files-to-prompt and feed the whole codebase or relevant portions to some smart model, like Gemini or OpenAI o1, and ask it to understand the problem. This is powerful because it allows you to control the context better and recruit a more powerful model with larger context window for a one-off analysis. It also won’t break your bank; a one-off analysis with a powerful model is often cheaper than having an agent burn through tokens in a fruitless loop.
3. Adding MCPs or using CLI tools to let Claude acquire context.
MCP is a Model Context Protocol. It allows to write tools that could be connected to any LLM application that supports it, including Claude Code.
When you are working with UI or Database, sometimes Claude gets stuck without a full picture of the error in the browser, or without understanding the database schema. In this case using Playwright MCP or connecting your Claude to the database either using database-specific MCP server, or teaching Claude to use database CLI, helps immensely. Playwright MCP can also read JavaScript console errors.
Armin Ronacher has a great post on using CLI tools with Claude: Tools: Code is all you need. It tracks with my experience. Claude Code is so good at using CLI tools, that most of the time MCP is unnecessary.
Agentic Coding vs Vibe Coding
Vibe Coding term was coined by Andrej Karpathy in his infamous Tweet/X post. He specifically refers to a type of coding with LLMs, where you accept all or most of the code generated by the model. The method described in this post allows you to choose your level of involvement, you can go full Vibe Coding mode, or you can review outputs of the model, starting with the spec generated and the prompt plan, and make your corrections.
Same goes for prompt execution. You can run Claude Code in auto-accept mode, or review all of the changes. You can also review the changes after individual prompt is fully executed, and apply corrections, steer the model in the different direction.
The level of control and involvement you apply, typically depends on your coding skills, how proficient the model is with the language you are working with, how difficult the task is, and the importance of the project at hand. If you are building a simple CRUD prototype of a web application with Python/React to illustrate a concept, you can go full Vibe Coding mode. Vs if you are building a critical part of your production infrastructure, like Kubernetes Operator for orchestrating your service deployments, you will probably review all of the changes, or even write some code manually, to make sure critical parts are working as expected. You also want to make sure the code has a sufficient test coverage.
Conclusion
Agentic coding is a powerful approach that can give you a significant leverage, amplify your existing skills, and help you to compensate for the skills you lack. However, it requires some investment of time, to develop an intuition for the LLM’s capabilities and limitations.
Start small, if you are feeling like the goal is overly ambitions, scale down, or break it down into smaller goals.
Use the planning phase for small tasks, or create a spec for larger tasks. Breat down your plan into smaller prompts.
Use external memory, i.e. prompt_plan.md to store the project status, don’t rely on model’s context. This way you can always reset a context and keep the whole project on track.
If you got stuck, use strategies described in this post, to gather necessary context, and involve a stronger model to help you overcome the challenge.